

| |
|
 02-19-2009, 04:55 PM
|
#1 |
|
Join Date: Jul 2008
Posts: 30
|
so after looking through all the galleries at everyone sweet looking cars i got a little jelous at the custom grills. so i looked up how much they would be to get for my car, 250-300 is a little too much to spend for me if it doesnt make my car go faster. so i got up from the computer still with that feeling of jelousy lingering and i went out to look at my car. it started with the thought "if i did get a new grill how tough would it be to take the old one off. so of coarse i decided to do some tinkering... i got it off (very simple) and decided to give it a whirl... i got some bondo, blue painters tape, sand paper, my angle grinder, a hack saw (in hindsight should have used the dremel) and some spray paint.
i did it all for 36 bucks and about 2 nights!!  What do you think? |

|

|
| Sponsored Links | |||
|
Advertisement |
|
||
|
02-19-2009, 06:26 PM
|
#2 |
|
Senior Member

Join Date: Sep 2007
Location: Pencilveinyea
Posts: 1,704
|
I think u did a nice job on it. IMO it would look better w/some kinda mesh behind it and the surround painted 2 match your body color, which is BSM looks like, but if your happy w/the way it looks now thats all that matters.

__________________
2013 Corolla S 5MT w/TRD springs & rear sway - Mike - |
|
|
|
|
02-20-2009, 04:53 AM
|
#3 |
|
Join Date: Jul 2008
Posts: 30
|
i actually did paint it silver the same as the car and didnt like it, i like the darker color because it makes the opening look bigger... i actually did put some mesh behind the unit its hard to tell from the last picture but its a 1/8" mesh, tough to secure, i ended using 5 minute epoxy and that worked great but i felt like my hands were gonna fall off before it dried all the way because i didnt have any clamps! haha. but im also thinking about using that accent color on the bottom scoop below the grill..... just a thought.
|
|
|
|
| Sponsored Links | |||
|
Advertisement |
|
||
|
02-20-2009, 06:21 AM
|
#4 |
|
Senior Member

Join Date: Mar 2006
Location: Cleveland/Shaker Hts., OH - USA
Posts: 2,268
|
Looks great!

__________________
<-- I love Winky, my "periwinkle" (ABP) LGT! - Allen / Usual Suspect "DumboRAT" / One of the Three Stooges Me: '16 Outback 2.5i Limited Wifey: '16 WRX Premium CVT 7th Subaru Family |
|
|
|
|
02-25-2009, 01:29 PM
|
#5 |
|
Join Date: Feb 2009
Posts: 19
|
DSC02300.JPG
So you all got me hooked on the DIY mods, so I decided to paint my grill. I didnt want to just start cutting, so I just painted it..... so here it is. |
|
|
|
|
02-25-2009, 02:41 PM
|
#6 |
|
Join Date: Jul 2008
Posts: 30
|
hey that looks great!!! it looks like almost the same paint i used! really sharp!
|
|
|
|
|
02-25-2009, 02:56 PM
|
#7 |
|
Senior Member

Join Date: Oct 2007
Location: Richmond, Va
Posts: 368
|
what color paint is it, what brand name.
|
|
|
|
|
02-25-2009, 08:56 PM
|
#8 |
|
Join Date: Feb 2009
Posts: 19
|
I used the Rustoleum Metallic black night....... picked it up at Lowes.
|
|
|
|
|
02-25-2009, 09:42 PM
|
#9 |
|
;-0

Join Date: Mar 2007
Location: Fresno - The arm pit of CA
Posts: 5,045
|
Looks good without the chrome.
|
|
|
|
|
02-26-2009, 04:16 AM
|
#10 | |
|
Senior Member

Join Date: Mar 2006
Location: Wisconsin
Posts: 1,149
 |
Quote:
Nice job lgt4me. |
|
|
|
|
|
02-26-2009, 08:44 AM
|
#11 | |
|
Member

Join Date: Jul 2008
Location: Rochester NY
Posts: 53
|
Quote:
|
|
|
|
|
|
02-26-2009, 08:58 AM
|
#12 |
|
Join Date: Feb 2009
Posts: 19
|
I taped over the emblem leaving the chrome exposed. Used some high grade sand paper to rough it up, then primed and painted it.
|
|
|
|
|
02-26-2009, 09:19 AM
|
#13 |
|
;-0
Join Date: Mar 2007
Location: Fresno - The arm pit of CA
Posts: 5,045
|
Here's my before and after with the chrome.
With chrome...  After Chrome...  Side view with my new "bling...bling" lights... 
|
|
|
|
|
02-26-2009, 10:15 AM
|
#14 |
|
Join Date: Feb 2009
Posts: 19
|
how long did it take you to clear your lights?
|
|
|
|
|
02-26-2009, 10:50 AM
|
#15 |
|
;-0
Join Date: Mar 2007
Location: Fresno - The arm pit of CA
Posts: 5,045
|
Depends on which way you do it. I used a heat gun, which is faster for me. Took me about 15 mins each.
The baking in the oven works too, it takes 10 mins to heat up, 5 mins to take out the amber, and 10 mins to reheat and reseal. 25 - 30 mins this way. |
|
|
|
|
02-26-2009, 05:27 PM
|
#16 |
|
Join Date: Jul 2008
Posts: 30
|
do you have a step by step process thread posted for clearing your lights? and did you have to buy yellow lights for your blinkers or just left them? very interested!!! looks awesome!!!!!!
|
|
|
|
|
02-27-2009, 10:08 AM
|
#17 |
|
;-0
Join Date: Mar 2007
Location: Fresno - The arm pit of CA
Posts: 5,045
|
Thanks.
We don't have a step by step thread for clearing headlights, but here are some simple steps. 1. Remove bumper, mostly popits and a few bolts. 2. Remove brackets under headlights 3. Disconnect harnesses and remove bulbs. 4. Remove the few screws holding the two pieces together on the housing. 5. Heat the edge either using heat gun or oven (250 degrees for 10 mins). 6. Pry the the two housings apart, it may require some grunting. 7. Remove the 4 screws holding the chrome reflector. 8. Carefully snap off the amber reflector, to much force and you can crack it. 9. Replace the remaining parts 10. Press the housing back together and reheat. Once heated press firmly around the edges and replace screws to secure the housing. This is the bulb I used for the turn signal. Turns amber when it lights up. http://autolumination.com/1156_1157.htm 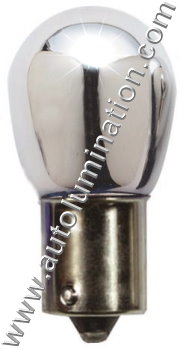
|
|
|
|
|
03-10-2009, 05:11 AM
|
#18 |
|
Member
Join Date: Jul 2008
Location: Rochester NY
Posts: 53
|
Way to consolidate those instructions! I'm wanting to clear mine but don't want to end up buying new lights when I screw them up.. I'm also really concerned with condensation in the lenses after reassembly.
On step 8.. you say "snap off amber reflector". Does it need to be broken off, or is it clipped/fastened in? |
|
|
|
|
03-10-2009, 06:42 AM
|
#19 |
|
Join Date: Mar 2006
Posts: 666
|
I think it is clipped in but its lot like you are gonna take it appart and put it back in
|
|
|
|
|
03-11-2009, 07:38 AM
|
#20 | |
|
;-0
Join Date: Mar 2007
Location: Fresno - The arm pit of CA
Posts: 5,045
|
Quote:
If you don't care to put it back in, then you can just yank it out. 
|
|
|
|
|
 |
| Currently Active Users Viewing This Thread: 1 (0 members and 1 guests) | |
| Thread Tools | |
| Display Modes | |
|
|


 Linear Mode

